How to make a Minecraft/Bukkit Plugin: A Beginner's Guide
Minecraft, the game that has captivated millions, is not just about building and exploring. It's also a platform for creativity and learning, especially when it comes to creating plugins or mods.
In this post, I will guide you through everything you need to know about getting started in your journey of plugin development. I personally have over 5 years of plugin development experience, and can safely say that when done right, it can be immensely rewarding.
While CraftBukkit was the pioneering software enabling such customization, it has since laid the groundwork for more advanced derivatives such as Spigot and PaperMC. For this post, I will be only using the Spigot API for compatibility and simplicity reasons.
In this post we will be creating a simple plugin that sends a custom message to a player every time they join the server. It would be beneficial to have at least a little prior experience with Java or some other programming language to understand the basic principles, as I'm not going over them.
Setting up your development environment
Install IDE
For this post I will be using IntelliJ IDEA, it's a free and popular choice for Java development. You can download it here.
Install JDK (Java Development Kit)
Developing plugins for the newest Minecraft versions (1.18+) you will need JDK version 17 or higher. If you want to create plugins for older Minecraft versions, using JDK versions 1.8 is a safe bet.
Download the recommended JDK here.
Verify Java installation
After the installation has finished, open up a new terminal / command prompt and run this command:
java -versionThe output should be the version you downloaded, which should be 17 or higher.
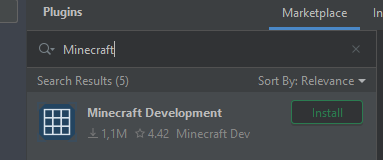
Download the Minecraft development plugin for IDEA
This plugin is not necessary for plugin development, but it does speed up things a bit. You should install it to better understand the steps later in this post.
In IntelliJ IDEA go to File -> Settings and select Plugins. In the search box type "Minecraft" and you should see the Minecraft Development plugin. Click install.
Creating a new project
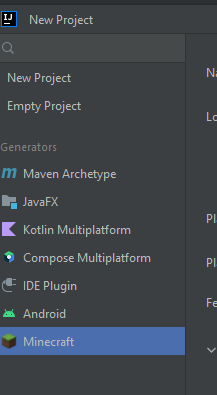
Now that we have installed the Minecraft Development plugin, creating a new plugin is easy as a pie.
In IDEA click "New Project". Then from the generators select Minecraft.
Give your project a name, and change the settings to what they are in the image below.
Change the Group ID to what you prefer. By convention use the reverse-domain name system, such as "org.username".
You can also change the other settings to your liking of course, such as adding yourself as the author in the optional settings. Just know that these can always be changed later.
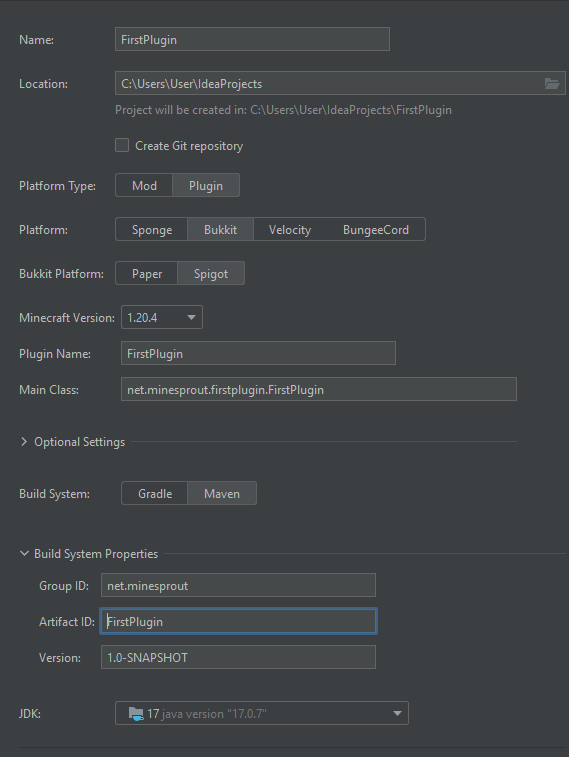
Now click create.
Adding the functionality
Before we add any code, I will go over some basic concepts in Bukkit development.
Events and Event Listeners
In Bukkit plugin development, events and event listeners are fundamental concepts that allow your plugin to interact with what's happening in the Minecraft world.
Events: These are specific things that happen in the game. For example, when a player breaks a block, joins the game, or an entity explodes. Bukkit generates an "event" for these occurrences.
Event Listeners: These are pieces of code that "listen" for when an event happens. When the specific event they are listening for occurs, the code you've written for that listener is executed. It's like setting a trap: when the event triggers the trap, your code runs.
In terms of code, an event listener in a Bukkit plugin might look something like this:
public class BlockListener implements Listener {

    @EventHandler
    public void onBlockBreak(BlockBreakEvent event) {
        // This code is run whenever someone breaks a block.
        // For example upon breaking Stone, this would log "Block broken: STONE"
        Bukkit.getLogger().info("Block broken: " + event.getBlock().getType());
    }
}
For simplicity sake, we will be making our main class (FirstPlugin) an event listener.
Adding the event listener in our plugin
You can copy the code into your plugin. We will be going over the changes soon.
public final class FirstPlugin extends JavaPlugin implements Listener {
    @Override
    public void onEnable() {
        // Registering this class as an Event Listener, so Bukkit knows
        // where to look for
        Bukkit.getPluginManager().registerEvents(this, this);
    }

    @Override
    public void onDisable() {
        // Plugin shutdown logic
    }

    @EventHandler
    public void onPlayerJoin(PlayerJoinEvent event){
        event.getPlayer().sendMessage("Welcome " + event.getPlayer().getName());
    }
}
Going over the changes
implements ListenerThis piece of code is to indicate that the class will contain Event Listeners.
    @Override
    public void onEnable() {
        // Registering this class as an Event Listener, so Bukkit knows
        // where to look for
        Bukkit.getPluginManager().registerEvents(this, this);
    }
Like the comments in the code say, that line of code will tell Bukkit where the Event Listener is located. Without this line the Event Listeners in our class won't be fired.
    @EventHandler
    public void onPlayerJoin(PlayerJoinEvent event){
        event.getPlayer().sendMessage("Hello " + event.getPlayer().getName());
    }
This is the actual part that will listen to the event that is fired when a player joins. Here's what each part does:
@EventHandler: This is a special marker that tells Bukkit, "Hey, the following method is one I want you to call when an event happens!" It's like putting up a sign that says "I'm interested in this event!"public void onPlayerJoin(PlayerJoinEvent event): This is the method that gets called by Bukkit when the event happens. You can name this method anything you want, but it's good to name it something that makes it clear what it does. In this case, it's handling what happens when a player joins the game.PlayerJoinEvent event: This is the event that we're listening for. It's passed to the method by Bukkit when a player joins the server. It's a class that contains all the information about the event that just happened.event.getPlayer(): This is how you get the player who just joined the game from the event..sendMessage("Hello" + event.getPlayer().getName()): Here we're sending a message to the player. We're usingsendMessageto send text directly to the player's chat. The message includes "Hello" plus the player's name, which you get by addingevent.getPlayer().getName().
Building our Plugin
In this step we will build and deploy our plugin. For this step it's generally a good idea to have a test server set up. If you don't have one I recommend setting up a PaperMC server by following the steps here. PaperMC is a blazing fast server software based on Spigot, so our plugin will work on Paper servers as well!
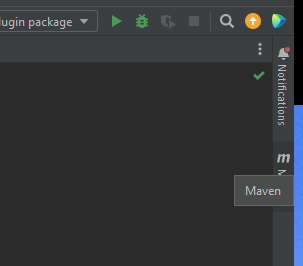
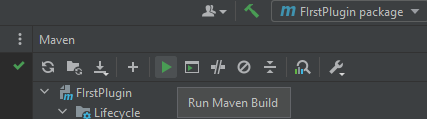
Build the plugin
Click the maven button on the top right corner of IDEA.
Then click the green play button to build your plugin. It should build without any errors.
Deploying the plugin
Open your target folder. This folder will contain the built plugin .jar file.
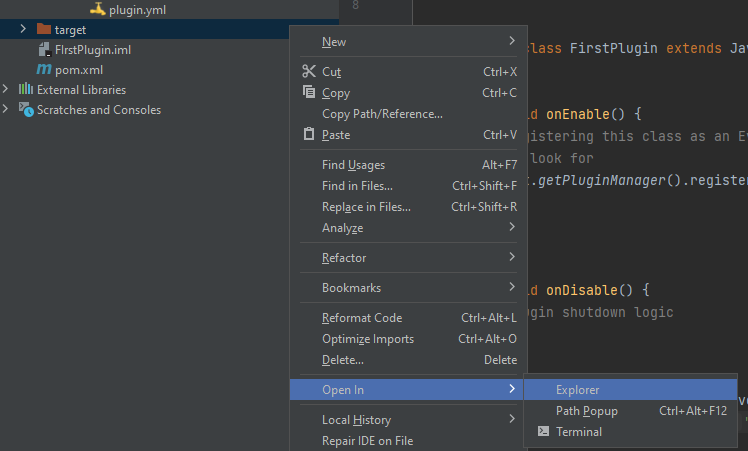
Copy the FirstPlugin-1.0-SNAPSHOT.jar file to your test server's plugins folder, and start your server.
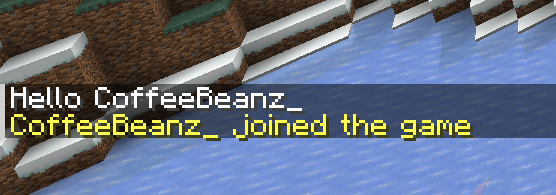
Upon joining your server you should be greeted with the message we specified earlier.
Tip: If you're looking to replace the original join message, you can add this line to the PlayerJoinEvent listener:
event.setJoinMessage("Welcome back, " + event.getPlayer().getName());The code for this post can be found here.
Conclusion
As we wrap up, you're now equipped with the essentials to start your own Bukkit plugin projects. It's a world brimming with possibilities, and you're just getting started. The journey ahead is filled with trial and error, but remember that every successful plugin began as a single line of code.
Your first plugin might be simple, but it's a leap towards greater things. Take it one step at a time, and don't be afraid to ask the community for help or advice. Bukkit development isn't just about writing code; it's about joining a community of creators who share your passion for Minecraft.
So go ahead, experiment with your ideas, no matter how small they may seem. Each project is a learning opportunity and a chance to add something unique to the Minecraft experience.
We look forward to seeing what you'll create. May each plugin you develop be a stepping stone to your next big adventure in coding and in Minecraft.
Happy coding!